Creating an Annotation
allow content authors to decorate their text with helpful information. That link I just threw your way wrapping "Annotations" is one example.
Let's build a new annotation that can wrap a span of text. Since we're always seeking attention, let's create a system that can highlight spicy takes.
For example:
🌶️ Cake donuts are not donuts
🌶️🌶️ Pixar ain't what it used to be
🌶️🌶️🌶️ Butt is legs
A content writer will be able to highlight a sentence and choose the spiciness level. The website will render the chili peppers and absolve the author of any responsibility. It's a perfect system.
Let's get started.
Create a new Sanity Annotation
Sanity has a guide for updating the portable text editor. It's a good starting point if you'd like to learn a bit more about the what and why of this section.
For our annotation to work, we'll need to setup a definition and a matching React component to render the annotation in our text editor.
To get started with a new annotation in Space Madness, let's create a new file in packages/content-models/src/blockContent/ named spicyTake.ts.
I'll drop in a block of code and explain what is going on.
import SpicyTakeRenderer from "../components/SpicyTakeRenderer";
import { type Rule } from "sanity";

export const spicyTakeSanityDefinition = {
  name: "spicyTake",
  type: "object",
  title: "Spicy Take",
  icon: () => "🌶️",
  components: {
    annotation: SpicyTakeRenderer,
  },
  fields: [
    {
      title: "Spice Level",
      name: "spiceLevel",
      type: "number",
      options: {
        list: [
          { title: "🌶️", value: 1 },
          { title: "🌶️🌶️", value: 2 },
          { title: "🌶️🌶️🌶️", value: 3 },
        ],
        layout: "radio",
      },
      validation: (Rule: Rule) =>
        Rule.required().error("Spice level is required"),
    },
  ],
};

export type SpicyTakeAnnotation = {
  _type: "spicyTake";
  spiceLevel: 1 | 2 | 3;
};
This is a "mark" annotation definition with additional data. Our spice level will be represented as a number between 1 and 3.
Below our annotation definition is our type definition that matches the portable text JSON data that will be returned from our query.
You may have noticed that we import a SpicyTakeRenderer React component. This is what controls the visual display of our mark in the Sanity Studio text editor. Let's create that next.
import { ReactNode } from "react";

interface SpicyTakeRendererProps {
  renderDefault: (props: any) => ReactNode;
  value: {
    spiceLevel: number;
  };
}

const SpicyTakeRenderer = (props: SpicyTakeRendererProps) => {
  const { spiceLevel } = props.value;
  return (
    <span
      style={{
        borderRadius: "2px",
        border: "1px solid var(--card-accent-fg-color)",
        padding: "2px 3px",
      }}
    >
      <span style={{ paddingRight: "3px" }}>{"🌶️".repeat(spiceLevel)}</span>
      {props.renderDefault(props)}
    </span>
  );
};

export default SpicyTakeRenderer;
This is another straightforward component. The one piece of 🪄 magic sprinkled in is props.renderDefault(props). This piece of code renders the text that gets wrapped up in our annotation, plus a few other goodies for the text editor to show us a popover with our spicy data.
We need to pull the spicyTakeSanityDefinition into our blockContent definition. Here's what that looks like:
// at the top of the file
import {
  spicyTakeSanityDefinition,
  SpicyTakeAnnotation,
} from "./blockContent/spicyTake";

// Truncated blockContentSanityDefinition
export const blockContentSanityDefinition = defineType({
  title: "Block Content",
  name: "blockContent",
  type: "array",
  of: [
    defineArrayMember({
      title: "Block",
      type: "block",
      ...
      annotations: [
          {
            title: "URL",
            name: "link",
            type: "object",
            fields: [
              {
                title: "URL",
                name: "href",
                type: "url",
              },
            ],
            icon: LaunchIcon,
            components: {
              annotation: ExternalLinkRenderer,
            },
          },
          internalLinkSanityDefinition,
          spicyTakeSanityDefinition,
        ],
      },
    }),
    ...
  ],
});

// Bottom of the file
export type Annotations = Array<InternalLinkAnnotation | SpicyTakeAnnotation>;
The modifications we make:
- Import the
spicyTakeSanityDefinitionand its type - Add the annotation definition to the
annotationsarray - Update the
Annotationstype to include Spicy Takes
The last thing we need to do is export our type data for use in the Astro site later.
// All custom marks, blocks, and types for Block Content
export * from "./blockContent/callout";
export * from "./blockContent/image";
export * from "./blockContent/figure";
export * from "./blockContent/internalLink";
export * from "./blockContent/spicyTake";
export * from "./blockContent/codeBlock";
export * from "./blockContent/embed";
export * from "./blockContent/partialInclude";
Our annotation is ready to go!
Head over to Sanity Studio, edit a document with a body, and try highlighting some spicy takes. You can highlight the text, then click the 🌶️ icon in the toolbar.

You should see your editor wraps the spicy take in a red border and prepends some 🌶️ for you.
We're halfway done at this point. Now we need to figure out how to render our spicy takes in the Astro site. But first, let's take a look at what happens when we don't define a way to render this annotation.
A short detour
If you haven't already, go ahead and publish your document that includes a spicy take annotation.
Spin up your Astro site with turbo dev and navigate to your document. Your spicy take is invisible. Like my mother's cooking, there is no spice to it. Try to inspect your annotation with dev tools and you should see something like this:
<p>Spicy takes are <span data-portabletext-unknown="mark">incoming</span> and I can't stop it.</p>The wonderful library is clever enough to not break our site with an undefined mark. Instead, it uses some graceful and invisible fallbacks to keep our site running. But we're not invisible, nor are we graceful, so let's add our custom annotation.
Create a Custom Annotation Component
Astro Portable Text organizes its components in a tree that roughly mimics the block content definition object.
PortableText.astro acts as the root component. It pulls in the other components and their fallbacks into a object.
Each type of component is pulled into the root component from their respective files: Block.astro, List.Astro, Mark.astro, etc.
In the Mark.astro file, we can pull in our custom Annotation component and map it to the spicyTake Portable Text object.
Let's create that component now.
---
import type { Props as $, Mark } from "astro-portabletext/types";
import type { SpicyTakeAnnotation } from "content-models";
export type Props = $<Mark<SpicyTakeAnnotation>>;

const {
  node: { markDef },
} = Astro.props;

const { spiceLevel } = markDef;
---

<span>
  <span class="px-1">{"🌶️".repeat(spiceLevel)}</span>
  <span
    class="underline decoration-dashed underline-offset-4 decoration-red-600/80"
    ><slot /></span
  >
</span>
The JSX section should look similar to our SpicyTakeRenderer.tsx component. The fancy Typescript code in the fence area helps our component understand the data passed to it from the Astro Portable Text library.
The raw JSON portable text data will look like this:
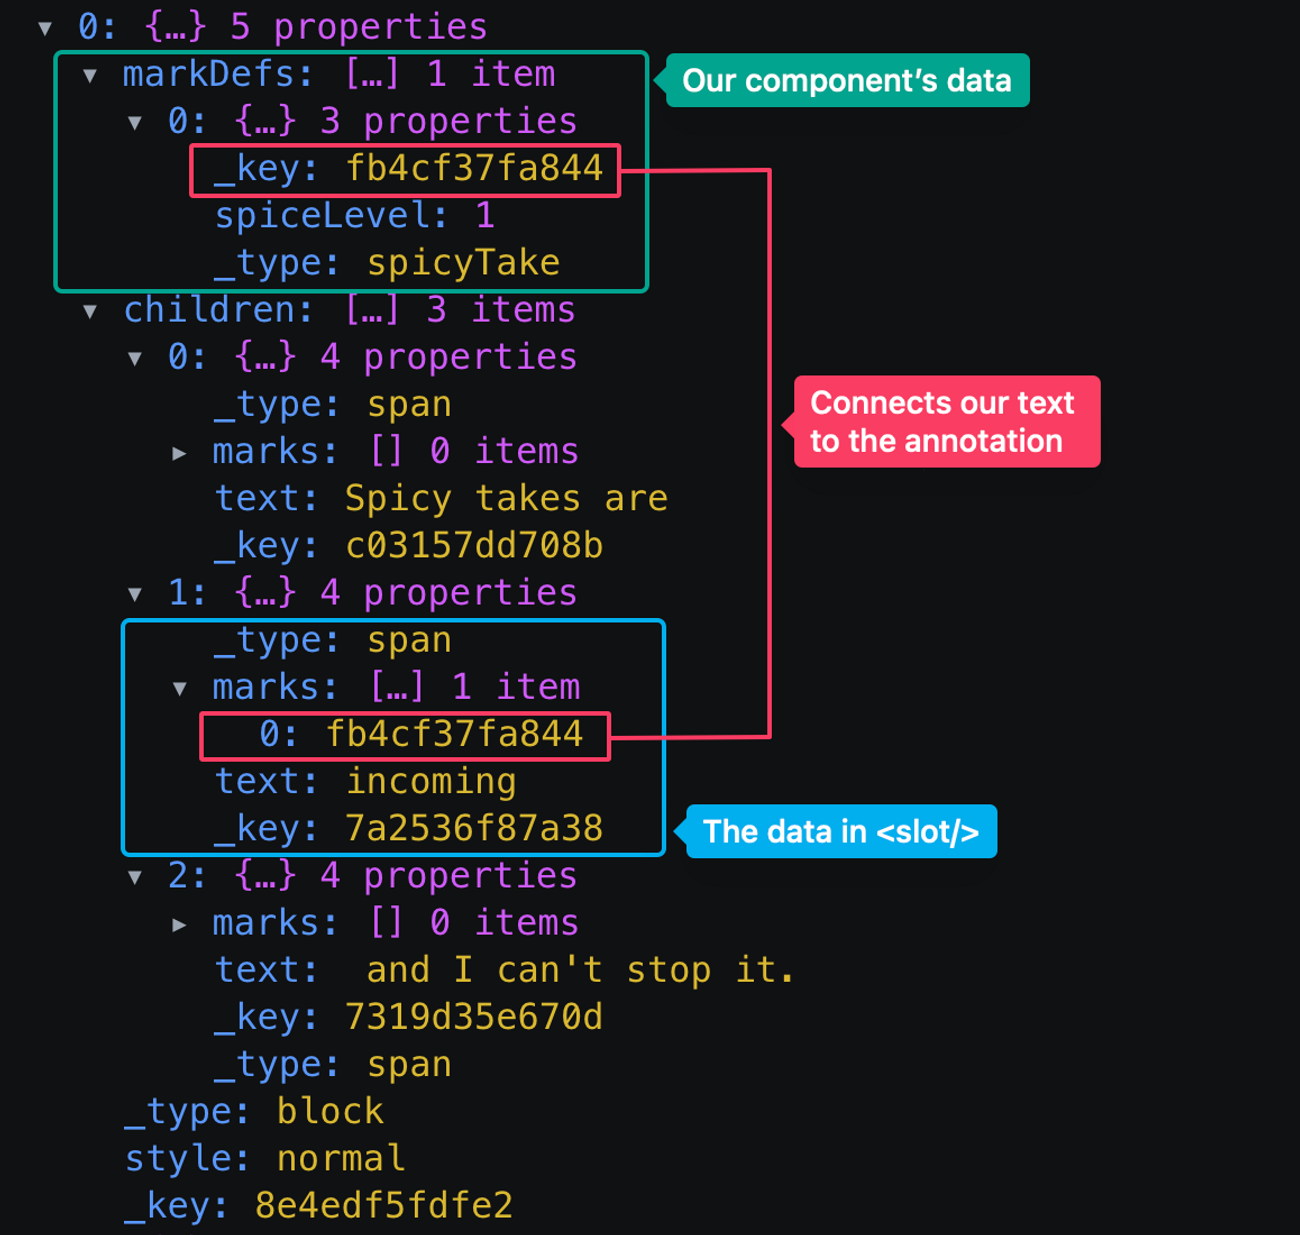
Our code fence grabs the markDef node and the spiceLevel data attribute.
We render a wrapper around the <slot /> with our chili peppers and some nice underline styles to show what text is spicy.
Once our component is defined, we need to pull it into the Portable Text Mark.astro component and link it up to the proper _type.
---
import { Mark as PortableTextMark } from "astro-portabletext/components";
import InternalLink from "./custom/InternalLink.astro";
import SpicyTake from "./custom/SpicyTake.astro";

export type Props = Parameters<typeof PortableTextMark>[0];

const props = Astro.props;
const markTypeIs = (markType: string) => markType === props.node.markType;

// Use `markTypeIs` to setup chained ternary operators to define custom marks
const Cmp = markTypeIs("internalLink")
  ? InternalLink
  : markTypeIs("spicyTake")
  ? SpicyTake
  : PortableTextMark;
---

<Cmp {...props}><slot /></Cmp>
That's all there is to it. The wonky ternary operator will route our portable text block to render the correct component based on its _type value. Remember our fallback component that renders when we don't have an annotation for our type? That's the PortableTextMark component at the end of the ternary, ready to catch all other _types, including the default marks like em, strong, and link.
Fire up your Astro site and check it out.

Wrapping up
Phew, we did it. We navigated some of the more complex parts of configuring Sanity and rendering Portable text.
Knowing how to add custom data and marks to your text will unlock tons of creative possibilities for you, and Portable Text gives you a sensible data structure to allow you to render your data however you choose.
Feel free to browse the other custom Annotation and Block Types that come built in with Space Madness. They should provide a template to help you build whatever your content project needs.